Showing posts with label kids corner. Show all posts

Monday, October 01, 2012

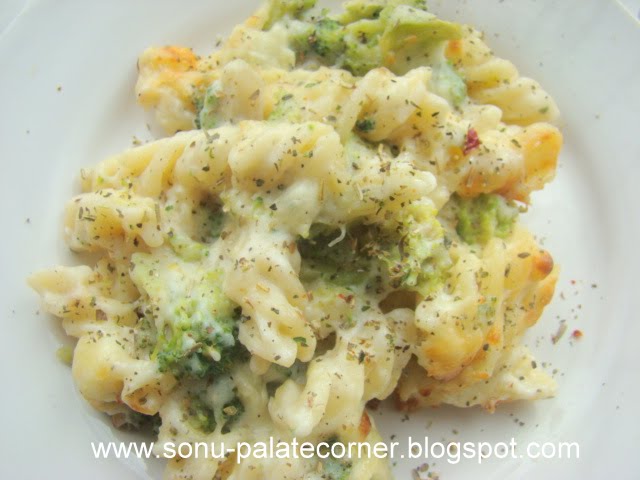
Oven hot Broccoli & Fusilli in white sauce,a winter warmer dish !

A week back i had been to my regular store to buy some groceries ,there i found a roll back offer on broccoli,a packet containing two small cute little heads of broccoli and then what,obviously i had to pick it up and put it in my shopping basket.No matter on whatever stuff i see the tag of " roll back price " i have some googly eyes going on there ;) .Finally i came home with my usual jam packed trolley and on the way my mind boggled for some good and healthy broccoli dishes.Its just that i always try and think of healthy food in dreams but while making i end up cooking the way i like to consume it ...and u bet it has nothing to do with health factor anywhere close  .The next day i made the broccoli and potato fry with one head and the other one was still lying in my refrigerator.I also found some cheese sitting in my fridge which i had to make use of or else it would straight away go into the trash.My daughter meantime started yelling that i never make fun food and when i asked her wht is this fun food all about,she said that according to her fun food means pastas/pizzas/burgers ....so here i go,hadn't much choice in hand i opted for pasta .So this is why i came up with this dish and i really thank my sweety pie for wrecking my brains to use pasta with this green beauty .

ingredients :
1 cup broccoli florets
1/2 cup cooked fusilli as per the instructions given on your packet ( you can use any pasta)
2 tbsp chopped onions
1 tsp of finely chopped garlic
1 cup white sauce
1/4th cup shredded cheese ( i used mozeralla)
salt to taste
black pepper pwd to taste
2 tsps olive oil
red chilli flakes / herbs for seasoning ( optional )
for white sauce :
1 cup milk
2 tbsps butter
2 tbsps plain white flour ( maida)
salt to taste
black pepper to taste

method :
Steam broccoli over hot boiling water,cover for 5 mins until its tender yet crispy.Meanwhile heat olive oil,fry onions till translucent ,add garlic and fry for few seconds till u get its fragrance.Turn off the flame,add cooked fusilli,steamed broccoli ,toss a little,sprinkle some salt and pepper and give it a mix.
Preheat the oven at 200c .
For making  the white sauce,melt butter in a saucepan,stir in the flour and fry till the colour changes and u get some foam.Add in the milk slowly little at a time and whisk continuosly to avoid lumps.Keep stirring till the milk boils and then lower the flame and keep stirring till the sauce thickens and is smooth enough.Simmer for 5 mins and turn off the flame.Sprinkle salt and pepper as per your taste.
Pour this white sauce in the broccoli and fusilli mixture and mix it  gently,transfer this mixture in a greased baking pan.Sprinkle some shredded cheese over and bake in a preheated oven till the cheese melts and you get brown spots.Sprinkle some italian herbs/chilli flakes and the broccoli and pasta bake is ready to eat.


Wednesday, October 13, 2010

Flaky Puff Pizza ...Domino's style ;-)

Have u ever been to Domino's recently and had their new vegeroma,square flaky puff pizzas ??If not then u should definately try once,i really liked it as it was very simple , light and at one glance you would know that u can make this at home..trust me this is the simplest of all and more over very instant one ,if  you have any unexpected gusts at home u can really try this one ,it would be a change over with your ready rolled store bought puff sheets ,this was my first attempt hence it was not that neat but dont go by pictures,the taste was simply awesome and delectable,it was really difficult for me to take these many pics as we all wanted to eat right away,straight from the oven and didnt wanted to waste a single minute on taking pics and plating it up :)).


makes 2 thin puff pizzas
ingredients :
2 ready store bought puff pastry sheets
1onion chopped
1 tomato chopped
8-9 jalepenos
8-9 pitted olives
1-1/2 cup shredded mozerella cheese
4 tbsp pizza sauce /tomato sauce ( i used store bought pizza sauce )
dried oregeno/pizza topper for taste
salt and black pepper pwd to taste
method :
Thaw the pastry sheets,spread the pizza sauce on one side.Preheat the oven at 200c.Spread shredded cheese,chopped onions,tomatoes,jalepenos,olives on to it,sprinkle some pizza topper or oregeno,salt and pepper and place it on a greased baking tray.Fold around 1/2 inch towards inside of the sheet from all the sides and place the baking tray in the preheated oven for about 10-12 mins or till the cheese is melted and the puff sheet is golden brown in colour,remove from the oven and cut into desired sizes and serve immediately.
pls note :
While baking the puff sheet might puff up (blow up ) from centre but dont worry once it is out of the oven it will settle down back.
You can make your own topping with ur fav veggies so go ahead and make your own flaky puff pizza .


Tuesday, October 05, 2010

ooey-gooey chocolaty puffs :D

This is the easiest dish i have ever made till date ,and was awesomely delish.In PRIYA'S words its" the easy breezy snack, perfect for the lazy evenings" and its so true,this is her recipe,so please have a look to the original recipe which i had bookmarked the day she posted on her blog.This is specially for a die hard  chocolate fans like my daughter,she is ready for chocolates any time of the day/night and she loved it like anything.It is made up of very simple and less ingredients and to top it ,any one can cook,even an 8-10yr old or even a bachelor for that matter can make these puffs ,also perfect for beginners and hardly it takes any time to cook and prepare,so with all these matching criterias im sending my chocolate puffs to ayeesha for her event "any one can cook "-a weekly event.Since its tuesday today and fortunately this recipe is a bookmarked one,im sending it to bookmarked recipes-every tuesday event started by priya and co-hosted by aipi.
makes 4 small puffs
ingredients :
1 ready rolled-store bought puff pastry sheet
few chocolate blocks/squares ( i used dark chocolate or you can use any leftover chocolate bars available at home )
1 tbsp milk ( optional,used just for glaze on puffs )
method :
Thaw the pastry sheet for 5-8 mins,cut into equal 4 parts,place 3-4 ( or depending on how much chocolaty taste u prefer ) small squares of chocolate bars in the centre of the sheets,bring the two ends togther and close the puffs ,using a fork press along the edges ( 3 sides) to give an impression and it will also help in sealing the edges.Brush the top of the pastries with little milk and place the puffs on a greased baking tray in a preheated oven at 190c or 350f for 10-12 mins or until the it is golden brown in colour and crisp.Serve hot with tea/coffee or on its own.

Friday, August 27, 2010

no cook strawberry (funny) bunny shape sandwhich for kids

My daughter is crazy for strawberries and last weekend when i forcefully took my hubby to victoria vegetable and fruit market here...he hates going to vegetable mkt  :(...we found the new season (spring is about to start ) starwberries which were too good looking and fresh and above all quite reasonable :P,i immediately picked up 4 boxes and  we 3 finished 2 boxes instantly,how crazy we 3 r ...actually not only my daughter but i would confess we all three like this fruit very much and those were very tasty also so we ended up eating more but the other 2 dabbas i kept away from my daughter as this time i wanted to make something out of this fruit as always we finish having only the fruit alone,so next morning i made strawberry pancakes which i already posted and today i made strawberry sandwhich for my daughter with her favourite bunny shape and she was jumping with joy after she saw me making them,she immediately wanted to have the whole bunny :),its a very simple ,easy,no cook sandwhich which iam sure all kids will njoy eating,also you can try making their fav shape which attracts them easily.Needless to say im sending this bunny to pari for her event kids delight and sana for her a visual treat event.

makes 1 sandwhich
ingredients :
4 sandwhich size bread slices ( i used white as my daughter likes white bread )
1/2 cup sliced strawberries
mayonnaise or any of your fav bread spread 
butter
for decoration i used -
$ sweets
m & m's
few julienne of baby carrots
mayonnaise
method :
Cut the centre white portion of the bread with circular sharp edged utensil ( i used my indian steel sharp edged katori ) or any biscuit cutter,spread mayonnaise on one side of the bread,place the strawberry slices and sprinkle some chat masala,cover with another slice of round bread with mayonnaise spread and serve.
for bunny shape : cut the bunny ear shape with your cooking scissors or a knife ,spread mayonnaise in centre and place a strawberry slice on it.For whiskers,first put some mayonnaise in centre and then place the carrot sticks ,for tongue use strawberry slice and some mayonnaise for teeth.For eyes i used m&m's and i sprinkles some dollar sweets for furry hair and on ears.

image

Monday, May 03, 2010

fairy bread / princess bread

This is the easiest snack for the kids and is simply effortless yet attractive and filling ,it is also handy and very good idea for a lazy early morning tiffins for kids,we can even cut the bread slices in any of your child's favourite shape and is also perfect for small kid's parties.


ingredients :
soft white bread  slices
butter
100's & 1000's balls ( used for decorating cakes/icecreams/cupcakes )
method :
Chop out the side brown portions of the bread.Apply butter on one side and cut it diagonally or any shape you wish with knife or even you can use a cookie cutter,sprinkle the tiny balls all over (they will stick automatically on butter).Its ready to serve.

Saturday, April 24, 2010

chocolate pedas

These days im am following too many blogs and when my daughter's birthday came closer by i literally was too happy and excited as i had a chance now to try all my fellow bloggers recipes which i had bookmarked since long,i was really amused by the various new inventions made by them and heartily thanx them for sharing those recipes ,im just learning more and more varieties these days ,i made these chocolate pedas for my daughter and her tiny friends and i felt it was too easy and quick to make as well,it was fun making these pedas as my kid also helped me ,she was quite excited as well and was njoying every bit to roll them in her tiny palms ,she was the first person to taste and she immediately responded by saying one word " yummy " and it really made my day.I picked up this recipe from my favourite blog priya's easyntastyrecipes who is very creative and innovative chef ,please guys do drop in her blog ,its my sincere request.I just made some slight changes in this recipe, i reduced the quantity of condensed milk ,the actuall recipe asks for 1+1/4 th cup of condensed milk where as i used only 1 cup which was perfect sweet for our family and i used dollar sweets instead of almond for decoration as i thought kids will find it more attractive.
ingredients :
2 cups milk powder
1 cup of sweetened condensed milk
1 tbsp butter
2 tbsp of dark chocolate pwd  ( i didnt had dark chocolate so used 2 tbsp of cocoa pwd )
1-2 tsp cardomon pwd
almond flakes / $ sweets for decoration
method :
In a microwave safe bowl mix milk powder,chocolate pwd/cocoa pwd,butter,condensed milk and cardamon pwd and mix well ,it will be quite sticky and stiff but do mix well and microwave it on high for 2-3 mins stirring occassionally till the mixture gets crumbled ( pls note ...the cooking time may vary according to different  microwave qualities ).Let the mixture cool for a while , form into the desired shape when still little warm,applying little butter on your palms.Decorate them with sprinkling a pinch of dollar sweets on them or else you can even use almond flakes instead.